Request a consultation

Whether you’re hiring a pro (recommended) or just preparing your home, these tips help ensure a smooth, clean, compliant install, and great long-term performance.
Before Installation Day
1) Confirm the Scope and Measurements
- Review your signed proposal: window/door types, sizes, glass, colors, hardware, and grids.
- Verify door handing and egress/lite requirements for bedrooms and baths.
- Re-measure rough openings, noting any out-of-square conditions.
2) Choose the Right Installation Method
- Insert/retrofit uses the existing frame—faster and less intrusive if the frame is sound.
- Full-frame replacement removes the old frame—best for damaged frames, air/water issues, or when changing styles/sizes.
Align the choice with performance goals and budget; ask your installer to explain why. Why hire a pro? Professional installation ensures proper flashing, sealing, and weatherproofing. According to the U.S. Environmental Protection Agency, upgrading from old single-pane windows to certified replacements can cut household energy bills by up to 13%. The 2024 Cost vs. Value report also notes that vinyl window replacements recoup about 67% of their cost at resale.
3) Plan for Water Management

Moisture is the enemy. Ensure your installer includes:
- Sloped or pan-flashed sills.
- Self-adhesive flashing applied shingle-style around the perimeter.
- Backer rod and low-expansion foam for insulation.
- High-quality exterior sealant compatible with cladding.
4) Prep the Home
- Clear 3–4 feet around each opening; remove blinds, curtains, art, and small furniture.
- Create a clear path from entry to work areas; protect floors.
- Secure pets and prepare for noise and dust.
- If painting or stucco is planned, coordinate the order and drying times with your installer.
During Installation
5) Verify Plumb, Level, and Square—Don’t Rush This Step
- Dry fit, then set with shims at structural points.
- Fasten per manufacturer specs (over-driving can warp frames).
- Check reveal gaps and sightlines before sealing.
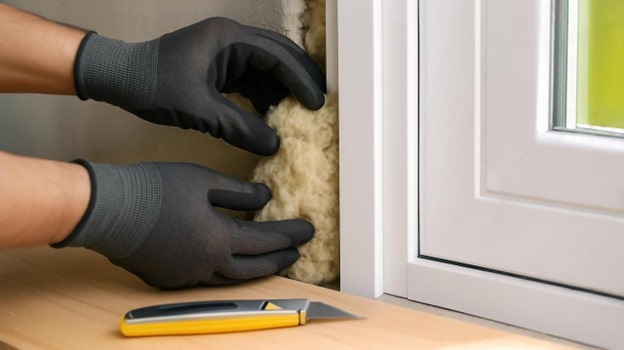
6) Insulate Correctly
- Use low-expansion foam or mineral wool; avoid over-filling.
- Maintain weep paths and drainage channels.
7) Seal the Exterior Like a Weather Jacket
- Apply sealant to clean, dry surfaces.
- Tool smooth, continuous beads.
- Follow temperature and cure-time guidelines.
8) Protect Finishes
- Mask cladding and trim if caulking or painting nearby.
- Use drop cloths; vacuum as you go to prevent scratches.
After Installation
9) Function Check & Adjustments
- Operate every sash and door panel; test locks and hinges.
- Confirm smooth operation and full engagement of multi-point locks.
- Lubricate hardware per manufacturer guidance.
10) Final Punch List & Documentation
- Review drywall, trim, or stucco patches.
- Confirm glass type stickers (low-E, tempered where required).
- Photograph each opening for records.
- Collect care instructions, warranty documents, and proof of permit/inspection.
11) Care & Maintenance Basics
- Clean tracks and hardware seasonally; keep weep holes clear.
- Use non-abrasive cleaners on glass and finishes.
- Re-caulk joints as needed over time.
Common Pitfalls to Avoid
- Skipping sill pans or mis-sequenced flashing.
- Over-foaming frames, causing bowing.
- Blocking weep holes with sealant or debris.
- Incorrect door handing or swing direction.
- Forgetting tempered/laminated glass in required zones (see International Code Council for current building code standards).
How Modern Windows & Doors Delivers a Great Install

- Certified crews trained on manufacturer specifications.
- Clean worksites with home protection and daily tidy-ups.
- Clear communication: arrival windows, progress updates, and next steps.
- Post-install walkthrough so you understand operation and maintenance.
Ready for a Neat, Compliant Install?
Request your in-home estimate and we’ll map out your project step by step. Disclaimer: Building codes and manufacturer instructions vary. Always follow the product’s current installation manual and local regulations. For best results, hire a licensed professional installer.
Related Posts